Practice Git and Github fundamentals
Imagine you are working on a project and you add some code to it that breaks the project and you want to roll back to that point that before the change was made. Git facilitates that by acting as a Version Control System.
Issues faced by early developers before git
- Developers had to submit their codes to the
central serverwithout having copies of their own - Any changes made to the source code were unknown to the other developers
- There was no communication between any of the developers
How git changed the scenario
- Every developer has an entire copy of the code on their
local systems - Any changes made to the source code can be tracked by others
- There is regular communication between the developers
What is git?
Git is a version control system used for tracking changes in computer files. It is generally used for source code management in software development:
- Git is used to
track changesin the source code - The distributed version control tool is used for source code management
- It allows multiple developers to work together
- It supports non-linear development through its thousands of
parallel branches
About Version Control
What is “version control”, and why should you care? Version control is a system that records changes to a file or set of files over time so that you can recall specific versions later. For the examples in this book, you will use software source code as the files being version controlled, though, in reality, you can do this with nearly any type of file on a computer.
What is Github
Github is a service-based upon git where people can share their code, contribute to Open Source, etc.
Imagine you are given a room to do whatever you want to with your accessories, customize our furniture as per your suitability ( each day ) any time. Permitted to share the place with someone, bring people to come at your place and party together and you don’t have to pay or rent all this with any bills. How cool would that be…!!
Github is a similar space. You have got free space to put in your code whatever maybe your file type - python, java, c, HTML, js, node js…etc. You may customize your code any day, any time, anywhere (having a network connection). You may allow people/fellow coders to contribute, commit changes to your work. Download your project’s code and use it for their work. Follow you and your work and a lot more.
Git vs Github
Git is used to store the source code for a project and track the complete history of all changes to that code. It allows developers to collaborate on a project more effectively by providing tools for managing possibly conflicting changes from multiple developers. GitHub facilitates social coding by providing a Web interface to the Git code repository and management tools for collaboration. GitHub allows developers to change, adapt and improve software from its public & private repositories.
Getting started with git
Step 0: Installation
For Windows Computers, go ahead and download the Git client from https://git-scm.com/download/win , just accept all the permissions (basically keep clicking ok until the installation is done), don’t change anything you don’t know.
For Linux Computers, just open the terminal and type
“sudo apt-get install git”
Click enter and git will be installed.
- For MacOS X Computers (Install homebrew if you don't have it already), open terminal and type
“brew install git”
Step 1: Setup
Open the Git Bash client(from step 1 of installation) if you are on Windows. For Linux/MacOS X just open up the terminal.
Before proceeding you have to configure git to your Email. It must be a GitHub/GitLab/BitBucket registered email, so when you push a commit (more on this later), your name will come up as the commit author.
The following commit will help you do that
“git config --global user.name "Your Name""
&
“git config --global user.email "you@example.com"”

Basic Git commands:-
- git init
- git status
- git add
- git commit
- git push
- git log
- git clone
Step 2: Baby steps - Making an Empty folder and Initialize Git
- Let’s start by making an empty folder named git-basics.
mkdir git-basics && cd git-basics

Let's understand what git init does before using it!
The git init command is the first command that you will run on Git. The git init command is used to create a new blank repository. It is used to make an existing project as a Git project. The command given below will create a new subdirectory named ".git" that holds all necessary repository files.
git init

Step 3: Making your first commit
Now to understand how "git add" works you can either copy-paste a file into the folder we made or make a readme.md file. I have made a readme.md file in this example. The "git add" command is used to add file contents to the git structure. This command updates the current content of the folder and prepares it for the commit!
git add . (The prefix changes according to the files you want to add. If you want to add all the file changes in the next commit, use the prefix "." . If you want to just add a specific file, use the "file" name as the prefix.)

Now we commit the changes we have made!
But before that, here's what "git commit" does; it is used to record the changes in the repository. It is the next command after the git add. Every commit contains the index data and the commit message.
git commit -m "My First Commit!" (-m subcommand is for the commit message. There are many more subcommands in "git commit" .)

Step 4: Making an Empty Repo and Pushing your first commit!
We have made our first commit, it's time we push it. For this make an empty repository on Github:

Now we push the commit to the empty repository we made. The term 'push' refers to uploading the local repository content to a remote repository(in our case it's Github). Pushing is an act of transferring commits from your local repository to a remote repository. "git push" has many subcommands about which we will learn later on in another guide.
git push <"Link to your empty remote repository"> HEAD:master

With this, you have successfully pushed your first commit! I hope, this won't be your last commit!

Step 5: Git log - History is always important!
The advantage of a version control system is that it records changes. These records allow us to retrieve the data like commits, figuring out bugs, updates, etc. But, all of this history will be useless if we cannot navigate through it. At this point, we need the "git log" command. "Git log" is a utility tool to review and read the history of everything that happens in a repository. Multiple options can be used with a git log to make history more specific.
git log

Step 6: Understanding "git clone" .
"git clone" is a command-line utility that is used to make a local copy of a remote repository so you can work on it locally. It accesses the repository through a remote URL. Usually, the original repository is located on a remote server, often from a Git service like GitHub, Bitbucket, or GitLab. The remote repository URL is referred to as the origin.
git clone <"Link of the repo you want to clone">

Step 7: Create a pull request (PR)
A pull request (or PR) is a way to alert a repo's owners that you want to make some changes to their code. It allows them to review the code and make sure it looks good before putting your changes on the primary branch.

This is what it looks like once you've submitted the PR request:

Step 8: Merge a PR

Step 9: Get changes on GitHub back to your computer
Right now, the repo on GitHub looks a little different than what you have on your local machine. For example, the commit you made in your branch and merged into the primary branch doesn't exist in the primary branch on your local machine.
To get the most recent changes that you or others have merged on GitHub, use the git pull origin master command (when working on the primary branch). In most cases, this can be shortened togit pull
git pull origin master

this shows you all the files that have changed and how they've changed.
Step 10: Undo a commit
To roll back to a previous commit get the commit id with the command git log and then use the git reset command.
Rolling back to the first commit
git reset 393612e2e8fc8dbfd2617ee5c78c3102c80a41c5
git log

Git contribution workflow
This section describes the git workflow that should be used when contributing to open source projects on GitHub. It assumes a very basic understanding of git (commits, branches, etc.) using the command line.
For this document, we will suppose that you want to contribute a patch to Four-musketeers/Environment-Friend
Cloning and forking the repository
The steps in this section only need to be performed once per repository - ## Step 6: Understanding "git clone" to get to know more about the command!
- Clone the repository. Click the green
Codebutton and copy the url and typegit clone clone-urlat the terminal
git clone https://github.com/Four-Muskeeters/Environment-Friend

- Fork the repo on Github to your personal account . Click the
forkbutton.

Add your fork as a remote. This remote will be named after your GitHub username. Go to the fork of your repository, in this case,
https://github.com/your-username/Environment(replace *`your-username`* with your GitHub username), and copy the clone URL as in step 1. `cd` to your clone from step 1 and rungit remote add your-github-username fork-url
(replace your-github-username with your GitHub username and
fork-url with the url that was copied to your clipboard). You will be
able to tell it is your fork url because it will have your GitHub username
in it.)
git clone https://github.com/Four-Muskeeters/Environment-Friend
cd Environment-Friend
git remote add developer-metalhead https://github.com/developer-metalhead/Environment-Friend-1

Making changes
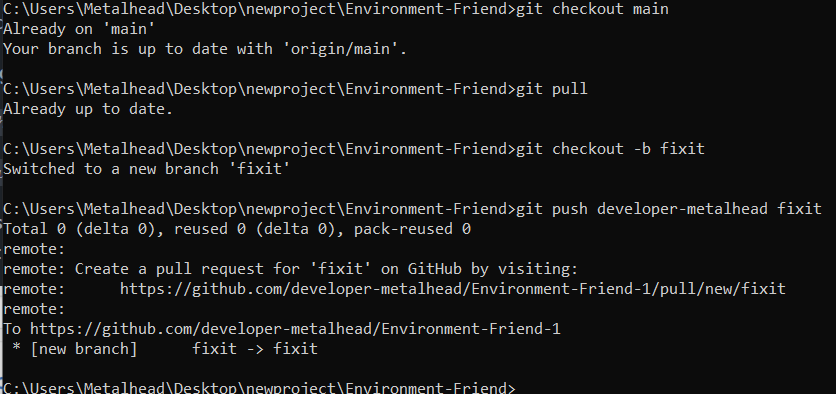
Update master. Before you make any changes, first checkout master
git checkout mainand pull in the latest changes
git pullThis will make it so that your changes are against the very latest master, which will reduce the likelihood of merge conflicts due to your changes conflicting with changes made by someone else.
Create a branch. Once you have done this, create a new branch.
To create the branch, run
git checkout -b branch-name(replace
branch-namewith the branch name you chose). This will create a new branch and check it out. You can verify this withgit status.git checkout -b fixitMake your changes and commit them. Once you have created your branch, make your changes and commit them.
Push up your changes. Push your changes to your fork. Do this by running
git push your-github-username branch-name(replace
your-github-usernamewith your GitHub username andbranch-namewith the name of the branch)git push developer-metalhead fixit
Make a pull request. If you then go to your fork on GitHub, you should see a button to create a pull request from your branch. It will look something like this. Click compare & pull request button

Enter a descriptive title in the title field ③. This is very important, as it is what will show up in the pull request listing and in email notifications to the people in the repo. Pull requests with undescriptive titles are more likely to be passed by. If the pull request fixes an issue, I recommend putting the issue number in the pull request description ④, not the title

Important points
You only need to clone and fork once per repository.
Always clone from the main repository and add your fork as a remote.
Never commit to master. Create a branch and commit to it.
Use
git statusoften to check what branch you are on and see if you have any uncommitted changes.Be descriptive in your branch names, commit messages, and pull request title and descriptions.
Once you have a pull request for a branch, you can push additional changes to the same branch and they will be added to the pull request automatically. You should never create a new pull request for the same branch.
Comment on the pull request when you want people to know that you have pushed new changes. Although GitHub does notify people of commit pushes, people are more likely notice your changes if you leave a comment.
Github actions
Github action is a platform to automate developer workflows.
When something happens IN or TO your repository --> automatic ACTIONS are executed in response
| Listen to event | Trigger Workflow |
|---|---|
| Issue Created | Sort/Label/Assign |
| Contributor joined | Direct them to a good first issue |
Other events: PR Created, PR merged
Some template Workflows:


